
These parts get 41.2" a year, soooo.
| 0.5 | 41.2 | 800 | 16480 | 316.9230769 | 7.545787546 |
| annual rainfall | ft² collection area | gallons/year | gallons/week | gallons/day/person |
This is if we create the first 2 buildings connected by a greenhouse. The roof space is estimated but we can also count things like carports or awnings as rainwater collectors also.
Every inch of space not used for growing is a potential rainwater collector. Every roof of your dwelling can collect your drinking, washing and bathing water. Your chicken coop can collect drinking water for your chickens. Putting up a canopy over where your dog hangs out can collect the rainwater that would otherwise create a mudhole that your dog would wallow in, creating more work for you when (s)he drags that mud through your house. Build him a nice outdoor shelter to keep his lounging area nice and dry and dusted with diatomaceous earth to minimize fleas and ticks, and use his canopy to fill his water bowl.
Using a compost toilet eliminates the need for flushing toilets so each person saves that 5 gallon/flush. Might do laundry at the laundromat the first year. The second year there'd be more collection area cuz we'll build more buildings. Showers will have to be quick 'navy showers' the first year. Watering gardens can come from rainwater collected off the land. If there's time a small plastic-lined dam at the bottleneck of the creek could serve as emergency backup.
Useful sites:
TheSelfSufficientLiving.com
Texas A&M screencast on rainwater harvesting (where I got the blue and white images for this blog)
Some notes for potable water collection:
- The slicker the roof the better, so that first flush scrapes off the initial debris. Best material is some kind of metal, like tin.
- The steeper the better, to get all the nastiness off the roof in that first flush. .
- Make sure gutters keep water away from the house and slope towards the downspout, so water doesn't stand in it or rest against the eves of the roof.
- Wide downspout.
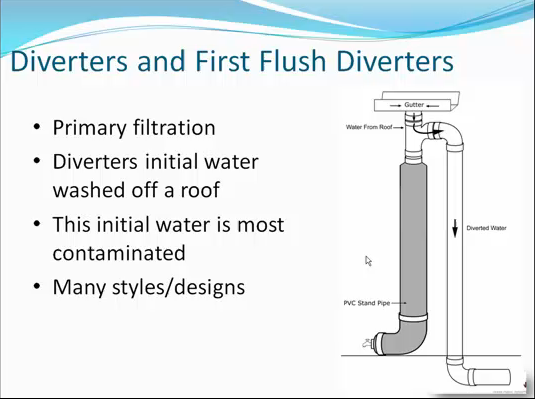
- You'll need a first flush device. A straight pipe with a floating ball, with a slow leak in the bottom to slowly release the water after the rain, will fill up with that first flush then the ball can block the top, diverting the cleaner water into a side pipe leading into the storage tanks.
- A screen should be placed just over the storage tank intake to catch the floating debris (like dead bugs).
- The intake pipe leading into the storage tank should turn up so it doesn't disturb the sediment at the bottom of the tank.
- The pipe leading out of the storage tank into the house, or the next tank, should have a screen and a float attached to take in water from somewhere below the surface and way above the bottom, to take in the least amount of whatever debris may have entered the tank.
- The overflow pipe should start at the bottom of the tank so if it lets out any excess water it'll do so from the bottom of the tank where any anaerobic debris may have settled.
- You should use a wider outlet pipe than inlet to prevent backup.
- Another outlet pipe can be a pipe cut at a 45° angle at the surface, removing whatever floating debris may have made its way into the storage tank.
- Screen all openings to prevent critters from entering the tanks.
- Divert overflow away from the tank to prevent it from eroding under the tank.
- Multiple tanks prevents total loss should something happen to the main tank. Maybe have a system in place that prevents water from flowing the opposite direction into a previous tank, in case it becomes damaged.
- Keep the water dark to prevent algae.
- Filter using gradually-finer filters, then reverse osmosis for drinking water.
- Solar pumps to move indoor water.

- Spring means pollen - tree pollen can contain a lot of tannin. Shut off valves to barrels farther from the first barrel and check it for tannin content before allowing it to mix with stored water.
- Build so checking for leaks is easy. Maybe taps under barrels funneling leaking water to an obvious place.

- So our plan is to use the first flush technique shown above.
- If we use multiple barrels(either mounted side-by-side or stacked on their sides) we can add as needed.
- Each barrel will need an external clear tube to measure levels so if there's a clog we can locate it.
- If we transfer the water from barrel to barrel using a floating intake, by the time water reaches 2 or 3 barrels in, it should be really pure from particles, at least the floating and sinking kind.
- Each barrel will need shutoff valves on both ends in case we have to clean or repair one.
- Each barrel will need a drain to pull sediment from the bottom.
- Any overflow should be directed towards a pond for cleaning.
- If there is overflow, we should add another barrel. You can never store too much water.
- We'll need to test often at first.
- We're planning to use reverse osmosis for drinking water.
- Separate barrel systems spread around the buildings can be a failsafe in case anything happens to one set, like a leak or contamination. If one set of barrels crashes we can get water from the others while repairing the damaged ones.
I just found this method for collecting rainwater containers. I may try to incorporate this into the array.

I'm wondering if hooking the faucet up to all the barrels at once will increase water pressure.
No comments:
Post a Comment