We want to use some strawbale for this first room/yurt/shack mostly for the speed at which the walls go up. We want to move in ASAP, even if it means a small space, because once we're in we can build every day. What's delaying our start is that the land is an hour and a half away and we can't spare a week to start digging just yet. But spring is coming and we want to give it another shot this year.
This is the basic design we seem to keep coming back to.

We dig 3-4ft below grade (depending on the est-to-west slope of the land), use the dirt to berm up about 4ft to the north, east and west sides, leaving the South face open to the sun. Surround it with french drains that flow east to west downhill. Use gravel and vapor barrier under an earth floor, and use either a dome or a shed roof. Leave a 3ft shelf at grade level before adding the wall and berm so it's not so hard to hold back the earth - sort of a step-up instead of trying to hold back an 8ft wall. The back shelf can act as a countertop, shelf base, beds, etc. The front under the window can be garden - directly planted into the earth. Can walls or posts and boards can shore up the 3-4ft wall. Earth rammed tires can support strawbale walls along the bermed areas. Posts would support the roof, though maybe the back/outer section of roof can just rest on earth-rammed tires right on the ground.
Here's another roof frame concept I came up with that distributes the weight of the beams to form a dome. The square in the center would be the hot air vent to outside. The smaller logs would be used for rafters, and the outside rafters would rest on the ground or berm.
 |
| my roof frame concept |
We're also considering using earth bags instead of strawbales if we have the time, because straw doesn't play well with 'undergroundedness' :-\ Might get too damp. But we would have a moisture barrier set up (blue lines in the top illustration) next to the straw, and a gravel gabion wall between the moisture barrier and the berm. Hopefully it'll keep the bales dry, but it's a risk. Even though they're not support walls, there's a lot of dirt behind them.
Here's a more recent model showing how we'd have to excavate.
 |
| from the west |
 |
| from the south |
 |
| view of the north berm |
 | |
| from the east showing the french drain |
I actually pulled our property off Google Earth using Sketchup then exported it as an OBJ file to make it compatible with other 3D modeling programs. I then imported it into a 3D program to 'dig out' the excavation site and created geometry to show the basic structure. There are a lot of free programs you could use instead, like Sculptris and Blender. So starting off with Sketchup's terrain importing tool was really valuable in making sure I could get that terrain right. It's hard to model accurately when you're only guessing at the grade and slope.
Here's how you do it....
Open Sketchup and go to the File menu and choose "File>Geo-location>Add Location...."

Find your location. You can also for a search for the address you want to use...

When you find the general area, click "Select Region" and it'll give you some handles to move around to zoom in on the exact area you want to create a model of....

Click on the "Grab" button and wait. It'll plop own a flat version into your scene...

Then go back up to your File Menu and choose "File>Geo location>Show Terrain" and there you have it...

Now you can either build your model in Sketchup or export it as an OBJ for another 3D modeling program...
Hit "File>Export"...

... then when the dialog box appears to ask where to save it, click on the little arrow to the right of the Save as type box and choose whatever file type you want to use. OBJ is the most universally used for most 3D modeling programs.

Now you know exactly how your terrain looks. If you need more detail you can zoom in closer when you first add your location. You can also add onto your location by hitting the "File>Geo location>Add More Imagery..." button after you've added the first one, but when you add more imagery, you'll have separate models, which makes it difficult when it comes to digging into your terrain. Also, you can't really dig into the terrain in Sketchup, which is why I'd import the OBJ file something like Sculptris for digging, then export it as an OBJ file again and Import it into Blender to make the geometric shapes.
There's a learning curve in all this, but worth it if you want to plan. I already work in 3D as my business, so my stuff's a little fancier than Sketchup, but even Sketchup can be useful by just plotting the shapes right through the terrain...

So that's that. Now onto planning our space...
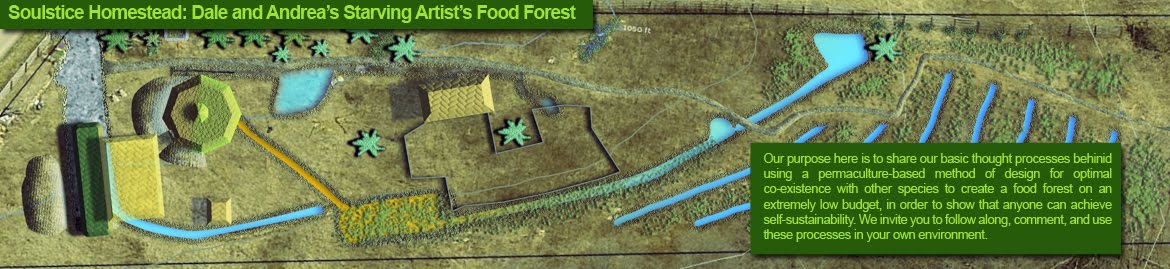
There's an existing rail fence around the north and east edges of the property but we'll have to either take out the northeast corner post and rails (shown above) so we can drive inside the fence, or use the existing 10' bordering the east side of the fence and park there (shown in the images below), only taking out some rails farther from the road. We're leaning more towards the latter. We'd really like to utilize as much land as we can strictly for growing food.
The water levels are exaggerated in the french drain, and optimistic at best for the ponds surrounding, but being in Ohio it's not all that unrealistic an expecation. We get almost 38" a year. The fence won't run through the french drain, that's just bad sculpting on my part :-) It's just to show the concept. The northeast corner is the highest part of the building area, flowing southwest. The french drain should catch any water coming into the property and direct it around the house area, stopping it in the upper, plastic-lined ponds (preferable pond liner, but we could also use old hot-tubs or above-ground pools). If it should reach a certain level it can overflow into lower ponds. The plan is to use them for irrigation and possibly aquaponics, as well as creating microecologies for more plant variety. Any excess house runoff can flow into these catchment areas also - but we'll likely get more barrels if that happens. you can never have too much water.
So on to Google Earth. From here, after working on the 3D model some more, I imported a rendering of it all from the top into Google Earth and fit it into position on the property. I saved a KMZ file so I can access it from anywhere. Not gonna make it public yet because the location is private til we can actually go and do something with it.


I've been kicking this roofing idea around a lot, and is the main reason I'm glad we haven't started yet. I'm not a carpenter, which is the point of doing this without knowing carpentry. I want to do something that anyone can do. I'm still doing some research. I want round timber. I really want to tie them together with rope or bailing twine because it's a stronger bond. But Andrea wants the timbers bolted together. I trust her judgement :-) I'll wait and practice on the critters' houses and see how they hold up in storms.
We brought the grandbabies out the weekend before last and kind of plotted out where we wanted to build. We went out there last weekend again by ourselves - just Andrea and me - and planted more stuff - mostly fruit trees and bushes. It was nice and sunny and warm and a great day to work outside. There are lots of thorny bushes where we planted, and it looks like we'll need some goats. We had already planted one peach tree there last fall, so we planted another one, a different variety, about 10 ft from it. Spacing the others 10ft apart, we added a cherry, space for another cherry, an apple, space for 5 more apples, and a pear tree. There were already some wild grapevines growing around the fence so we build a tripod trellis for them and draped them up them to help them grow. Then, since those grapes were doing so well there on their own, we planted the 2 varieties of grape we brought with us on their own trellis. We planted a loganberry bush near some blackberries and made a long trellis to hold them up. Loganberries are a lot like blackberries, so mingling them together should be interesting. Andrea planted some garlic around the apple trees because we'd read they're good companion plants. There are a lot of multiflora roses around too, so we planted a tripod of pink knockout roses with them. The first blueberry bush I planted died - probably because I planted it in partial shade at the bottom of a hill along a swale. Found out later they don't like wet feet. I should've planted it on a mound if I was going to use the swale at all. So this time the 2 blueberry bushes we planted were up at the top of the hill near the pear tree, but with lots of pine needles and coffee grounds to acidify the soil more to their liking. Near there we added the persimmon trees we had from last year that wintered in pots in our front yard. Not sure they were alive but they did have a touch of green on them so we'll see.
Then it occurred to me last night while I was thinking about what a nice day we had planting all day, that I could go back to this KMZ file and keep a standing record of what, when and where we planted. I labeled what we planted and put more detailed info under the properties, so when you right-click on the icon and hit properties it'll all be in there.

Yeah - what an awesome way to keep track! I'll replace the icons with some I'll make myself when I have time - make them available here for download in case someone else wants to use this idea. But from here, I can now keep detailed records of each thing we plant and everything we build and every swale or water feature we create and it's progress (or failures). You might also note in the above screenshot that you can also add links and images to the descriptions. That can come in handy for storing photos of the actual plants or features, as well as for storing links to websites that have valuable information we need to keep on hand for when we actually implement whatever plans are created in the models. For instance, companion plants for that particular plant, or craigslist ads for maybe a hot tub shell we can convert into a pond, etc.
You can also work in layers in Google Earth, so if it gets too busy we can break up everything into plants for one layer, swales and water features for another, critter huts for another, kid's houses, tools (like solar dehydrators and windmills), proposed changes.
So this started out as just mentioning that we planted stuff, but the last couple days have been days of discovery for me. Google Earth is proving to be more useful than I had anticipated.