Wednesday, March 18, 2015

Rocket Mass Heater Designs

I've done a lot of research on rocket stoves and rocket mass heaters --- to the point of obsession.Their design is ingenious. They've taken all the principles of all the masonry furnaces and wood stoves and created a marvel.

image cred: http://en.wikipedia.org
The first rocket stoves I saw were made by folks called "bushcrafters" - people who make useful stuff out of stuff they find. They'd use coffee cans or soup cans and arrange them so the fire burns hot and the heat goes directly to the cooking pot - very little heat is wasted. I thought it was a great idea for camping without having to take a camp stove and fuel along -- just use the wood from the surrounding camp - and not a lot of it either. The fire burns so hot you just need a little to get your food cooked.

I like a fire at night when I camp, but sometimes it's nice to just not have a fire at all - just let my eyes get accustomed to the dark and listen. I call it "using my radar" - where I just plop myself on a log and listen as intently and as far away as I can without the noisy crackling of a campfire, picking out all the faint, distant sounds and wondering what made them. Sometimes you hear coyotes, or a sampling of interesting owl songs. I once heard a mouse scurrying and squeaking in the cave I shared with it. These little coffee can rockets stoves burn just enough wood to cook on, so you can still have a hot meal on nights you want to enjoy the quiet.

image cred: http://www.inspirationgreen.com
So I thought these little soup-can stoves were the extent of it, until further investigation into rocket stoves revealed all sorts of designs, some that incorporated heavy insulation around the burn box for hotter fires, leading to an inverted 55 gallon steel drum that can radiate heat into your room like a wood stove. From there the introduction of cob sculpting took the design to amazing new heights! You can run the exhaust stovepipes through gobs of thick thermal mass (in the form of a long cob bench) horizontally - and then out a tall chimney all the way at the other end of the room - and the heat from the exhaust gets stored in the thermal mass bench along the way, releasing slowly into the room for hours after the fire's gone out.

I saw some of these in person -- one at the Mother Earth News Fair at Seven Springs PA and another in use at the Earthship at Blue Rock Station here in Ohio. The concept is simple, effective and the most efficient design in the world. You don't need to split wood and burn logs. You basically heat with kindling, creating fires so hot they don't even leave creosote, storing the heat in the thermal mass for hours. You can literally heat an efficient home (like the one we'll build) using the deadfall from a few acres of woods. Coppicing a willow or even using bamboo growing in old humanure compost can produce a steady supply of wood, too.

Though the fire burns super hot, by the time the heat from the exhaust reaches the other side of the room, it only heats up the vertical chimney to about 120 degrees or so, and there's so little smoke that folks in the city have piped these out their window and the neighbors don't even know there's a wood burning heater in the house. Good way to fly under the radar to avoid paying those nasty heating bills in cities that don't allow wood-burning heaters.

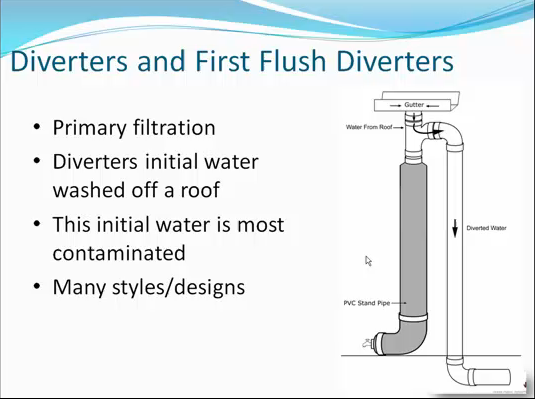
I love this illustration next. It gives you all the necessary proportions so you can tweak it to suit your home.
(compliments of Permies.com). See how you can just toss in long sticks and let them feed themselves into the fire at they burn down? After having heated with a woodstove in Hocking County for a few years, the thought of not having to split wood or constantly feed a fire is a comforting one. I plan to design my stove with a cage over the hot box so I can stack long branches that will self-feed the fire for longer periods of time, so I don't have to.


I'd like to build a small one under our bed so in winter we can burn a few sticks an hour before bedtime and let that heat rise slowly from under our bed.

This is great design for a kitchen stove:

 Soon after we talked together about using a cast iron griddle for a cooking surface, lo and behold a good friend just happened to buy us one for Christmas. This so far is closest to the design I'd like to use for our kitchen.


Monday, March 9, 2015

Rainwater Collection - updated 9/22/15

collectable rainwater (gallons) = 0.5 x rainfall (inches) x area (square feet) of collection surface

These parts get 41.2" a year, soooo.

0.541.280016480316.92307697.545787546

annual rainfallft² collection areagallons/yeargallons/weekgallons/day/person

This is if we create the first 2 buildings connected by a greenhouse. The roof space is estimated but we can also count things like carports or awnings as rainwater collectors also.

Every inch of space not used for growing is a potential rainwater collector. Every roof of your dwelling can collect your drinking, washing and bathing water. Your chicken coop can collect drinking water for your chickens. Putting up a canopy over where your dog hangs out can collect the rainwater that would otherwise create a mudhole that your dog would wallow in, creating more work for you when (s)he drags that mud through your house. Build him a nice outdoor shelter to keep his lounging area nice and dry and dusted with diatomaceous earth to minimize fleas and ticks, and use his canopy to fill his water bowl.

Using a compost toilet eliminates the need for flushing toilets so each person saves that 5 gallon/flush. Might do laundry at the laundromat the first year. The second year there'd be more collection area cuz we'll build more buildings. Showers will have to be quick 'navy showers' the first year. Watering gardens can come from rainwater collected off the land. If there's time a small plastic-lined dam at the bottleneck of the creek could serve as emergency backup.

Useful sites:
TheSelfSufficientLiving.com
Texas A&M screencast on rainwater harvesting (where I got the blue and white images for this blog) 

Some notes for potable water collection:
  • The slicker the roof the better, so that first flush scrapes off the initial debris. Best material is some kind of metal, like tin.
  • The steeper the better, to get all the nastiness off the roof in that first flush. . 
  • Make sure gutters keep water away from the house and slope towards the downspout, so water doesn't stand in it or rest against the eves of the roof.
  • Wide downspout.
  • You'll need a first flush device. A straight pipe with a floating ball, with a slow leak in the bottom to slowly release the water after the rain, will fill up with that first flush then the ball can block the top, diverting the cleaner water into a side pipe leading into the storage tanks.
  • A screen should be placed just over the storage tank intake to catch the floating debris (like dead bugs).
  • The intake pipe leading into the storage tank should turn up so it doesn't disturb the sediment at the bottom of the tank.
  • The pipe leading out of the storage tank into the house, or the next tank, should have a screen and a float attached to take in water from somewhere below the surface and way above the bottom, to take in the least amount of whatever debris  may have entered the tank.
  • The overflow pipe should start at the bottom of the tank so if it lets out any excess water it'll do so from the bottom of the tank where any anaerobic debris may have settled.
  • You should use a wider outlet pipe than inlet to prevent backup.
  • Another outlet pipe can be a pipe cut at a 45° angle at the surface, removing whatever floating debris may have made its way into the storage tank.
  • Screen all openings to prevent critters from entering the tanks.
  • Divert overflow away from the tank to prevent it from eroding under the tank.
  • Multiple tanks prevents total loss should something happen to the main tank. Maybe have a system in place that prevents water from flowing the opposite direction into a previous tank, in case it becomes damaged.
  • Keep the water dark to prevent algae.
  • Filter using gradually-finer filters, then reverse osmosis for drinking water.
  • Solar pumps to move indoor water.
Maintenance:
  •  Spring means pollen - tree pollen can contain a lot of tannin. Shut off valves to barrels farther from the first barrel and check it for tannin content before allowing it to mix with stored water.
  • Build so checking for leaks is easy. Maybe taps under barrels funneling leaking water to an obvious place.


  • So our plan is to use the first flush technique shown above.
  • If we use multiple barrels(either mounted side-by-side or stacked on their sides) we can add as needed. 
  • Each barrel will need an external clear tube to measure levels so if there's a clog we can locate it.
  • If we transfer the water from barrel to barrel using a floating intake, by the time water reaches 2 or 3 barrels in, it should be really pure from particles, at least the floating and sinking kind.
  • Each barrel will need shutoff valves on both ends in case we have to clean or repair one.
  • Each barrel will need a drain to pull sediment from the bottom.
  • Any overflow should be directed towards a pond for cleaning.
  • If there is overflow, we should add another barrel. You can never store too much water.
  • We'll need to test often at first.
  • We're planning to use reverse osmosis for drinking water.
  • Separate barrel systems spread around the buildings can be a failsafe in case anything happens to one set, like a leak or contamination. If one set of barrels crashes we can get water from the others while repairing the damaged ones.
Update 9/22/15
 I just found this method for collecting rainwater containers. I may try to incorporate this into the array.
I'd put the overflow pipe on the end opposite the intake. Maybe put another overflow higher up on the original barrel in case the water comes in faster than it can flow into the next chamber.

I'm wondering if hooking the faucet up to all the barrels at once will increase water pressure.