Sunday, October 11, 2015

Help from the Walnut Husk Fly maggot


So today I had to hull walnuts from their husks.

Not a job I was looking forward to because I'd never done it before and always heard they were a PITA. I was a little late getting to them because I had some tight deadlines in my job, so they started to turn dark and funky looking. I thought, ew. But thanks to the hard work of these little guys....


...hulling these bad boys turned out to be a breeze. They'd been working hard the last few weeks munching on the husk, turning it unto compost, and separating it from the nut shell. So by the time I sat down to do the work, all I had to do was don some plastic bread bags to keep my hands from getting stained and pull the husks off with my hands - no tools needed.

The green, untouched husks were so tough I had to use a sharp garden weeding tool, the kind you dig up dandelion roots with, to scrape off the hulls in a fashion not unlike flint-knapping, and ended up ripping the bread bags and jabbing my fingers a few times in the process. Their hard work saved me from having to use a few choice expletives, and turned what could've been a tiring day into a pleasant one. The image to the right shows how the green, uneaten hulls still stick to the shell, and literally have to be chiseled off.

So instead of all that chiseling, I was able to pick up the dark stained walnuts, which were soft under a flakey peeling, and just pull the husk away with ease. I gently picked off the babies, tossed them into the hull pile so they could finish their reward, and puffed the other ones off with a quick puff of air. The walnuts inside are fine - untouched, uneaten and clean. Dirty on the outside, but after they dry in the fall air the next few days (supposed to be in the 60's and 70's and sunny the next 4 days) all I have to do is brush them off and crack them open.

from ipm.ucdavis.edu
I looked the little guys up online and it appears that this is all these little flies do. They live underground by the walnut trees, turn into flies and lay eggs inside the walnuts' hulls, then put their babies to work gnawing away at the hulls. That's it. They don't go around biting people or build cocoons in your flour or drill into your fruit - they just eat walnut hulls.

And to think they're called pests - well at least by those corporate 'commercial growers', cuz they turn their walnut hulls from green to black, and their 'customers' want pretty green walnut hulls :-\ Funny these companies spend gobs of money poisoning their orchards with ridiculous amounts of pesticides to kill these creatures, who are doing absolutely no harm to the walnut meats at all, and who make the task of hulling them a total breeze.

Why I posted this here? Observing things like this in nature and using it to your advantage is what permaculture and sustainable agriculture is all about. I never knew these guys existed til today. I could have let prejudices about them being nasty little maggots cloud my sense of judgement. I could have thrown away all those walnuts without trying to understand the nature of these creatures. Instead, I saw the little guys for what they were - hungry babies - busy little walnut huskers - filling up for a long winter nap, and doing me a favor.

I have an idea for next year. Rather than disturb the little critters by pulling off their husks before they're finished eating, maybe I should just keep them under the walnut trees on a tray with a chickenwire bottom, maybe a few inches up off the ground so they don't get moldy or eaten by other bugs, and let the babies finish off their meals in peace. If I put another layer of chickenwire on the top of the tray, it'll keep the squirrels out of them.

That way, when they're done, they'll just burrow their way out of the hulls and drop down into the ground, where they'll dig down, hibernating for a year or two so they can grow up and make more workers for the next seasons. The hulls should be ready for me peel off easily without having to worry about hurting them or taking the time to pick them off the walnut shells..

I wasn't sure I'd be able to use my own observations to come up with my own time-saving methods of food growing and harvesting. I've read a lot about tricks to make gardening easier, but mostly the writers of permaculture books and articles all say that you have to observe your own environment and discover your own shortcuts and timesavers to let nature work for you. Now I'm seeing that even a noob like me can do it.

Saturday, June 13, 2015

Tricking Mother Nature into Working for You

These snippets of info are a list of tricks I picked up from lectures, writings and videos I encountered in my research:

  • Water always seeks it's own level. Use it to stop the rainwater from running off your land. 
    Instead of draining water off your land or away from your land, only to pipe water in from town or a well and use it to irrigate your garden, dig swales and ponds, using anything that will catch and/or store water. Bury old bathtubs or hot tubs on your land. Catch water off your roof and every other structure and funnel it into barrels or tubs or even clay pots buried underground (unglazed clay pots can slowly seep water into the soil during dry times). Even create subterranean tunnels channeling water from outdoor ponds to indoor aquaculture (see below) tanks so your fish have a place to winter. While you enjoy their ambiance you can feed them your dinner scraps right off the table, cutting back on having to buy fish food. If your pond fills up, channel the overflow across your property along the contour (the same elevation) then have it drop into a slightly lower pond, and every time a pond fills up, direct it to another. This creates lots of 'edges' and micro-climates necessary for a wide variety of edibles.
  • Put a 15ft T-shaped pole in your garden area. It gives birds a place to land, and to check out the area for predators and food. They'll poop there, depositing free fertilizer into your garden. If they're insect eaters, there poop will be very rich in nutrients! Put lots of 3-5ft sticks around the area also. Flycatchers are common in Ohio. They'll perch on a stick, watch for flying insects, fly right out and snatch them out of the air, then fly right back to their stick. Birds make wonderful pest control sentinels - and they'll do it all day - for free, all the while depositing nutrients into your soil.
  • Likewise, you can build a bat box right over your compost heap. Bugs are drawn to your compost. Bats are drawn to bugs. Bats will fly around the compost heap, snatching up flying insects, including mosquitoes, then deposit nutrient rich guano into your compost - for free - all night long. They love mosquitos too.
  • Aquaculture: Put fish in a tank of water or a home-made pond. Use a solar pump to move the dirty water (that the fish have been pooping in) out of the tank and into the roots of food producing plants, once every 12 minutes, then move that water (that the plants have now cleaned) back to the fish tanks. This technique enabled one man to produced a million pounds of food in one year, using just 3 acres of land.
  • An easy way to keep your garden fertilized is to put an old
    bathtub uphill from your garden, toss in some gravel and dirt and create a rain catching surface so it'll fill with water. Build up the sides with bermed dirt and plant lots of plants so it looks like an elevated pond. Plant food that ducks and geese like, so eventually they'll will drop by and nibble on some, and occasionally leave a little fertilizer. The tub's drain can have a pipe attached that bends up to the level you want in the tub to top out at. Every rain some drains out as rainwater enters and the water empties out of the drain to sek it's own level, taking with it the duck poop from visitor ducks. The rain then washes the dirty water down the hill and through the soil, feeding worms, bugs and eventually plants along the way.
  • Honey bees aren't the only pollinators. Drill holes in scrap wood and leave it standing or lying around your garden to draw solitary bees into your ecosystem. Many of those pollinate too. Butterfly boxes bring in butterflies. Hummingbird feeders bring hummingbirds. All pollinators. Plant lots of flowers around your property to bring them all in.
  • Creating cracks and crags and places for spiders and garter snakes to live will add to your natural pest-control arsenal. There's a wasp that lives in holes in wood that lays its eggs in worms that would otherwise eat your tomatoes. Another reason to leave wood scraps full of drilled holes posted in your garden area. (Maybe plug a few with shiitake mushrooms?)
  • In a garden setting, dogs and cats can be full-time sentinels - watching out for deer, coons, rabbits, and other garden-raiders. It might cost you some fencing (unless you can scrounge some free off Craigslist) but you can create chicken wire tunnels surrounding your garden that provide a 'dog and cat' run - a ring around your garden area that allows your pets to run and play and explore, while also keeping them, and veggie-eating critters, out of your garden.
  • Bamboo grows fast and strong. Use it to clean up your greywater, and your humanure compost pile, then when it's grown tall and thick enough, cut it back and use it to build with.
  • We're vegan but we're still planning to get chickens, ducks and goats. Chickens will eat ticks, slugs and bugs. Building movable coops can help prep your garden, cuz they'll dig up grubs. Ducks are easier on a garden and still eat lots of bugs, and poop in your pond (that can go to your aquaculture tanks). Letting guineas run in your woods will help cut back on the ticks so your kids can play, with less fear of Lyme disease. Goats will eat multiflora roses and other thickets. You can pen them to areas in your woods you'd like to clear and they'll do the work for you. Use them to not only widen your garden area, but fertilize it too. Feed your goats your veggie scraps that are too course for the compost pile, or just to speed up the composting process. Goat poop is good stuff.
  • No Till Gardening! There's a lot of productive stuff going on under the cover of that thick thatch of dead vegetation covering your garden. When you till, you disrupt all that work that bugs and critters and bacteria and fungi have been doing all year to make your soil nutrient-rich. Why put in all that physical labor undoing what nature has been doing for you? Your garden takes nutrients from the soil, you only pick the seeds and fruits (and veggies). The rest you don't need. In the fall, let your leftover plants drop where they grew. They'll return a good 80% of the nutrients that they took when they were growing and will compost down again, replenishing your soil while providing protection from the elements and hold in moisture for your new seeds when you plant something new.
  • Heat rises. I don't recall ever needing to open a window to warm a place up. Always it's to let cool air in and warm air out. American homes put operable windows at shoulder level and lower. I've always thought that was the dumbest idea. Too low to vent the heat, warm air is trapped at shoulder level. Too high to let in any cool air. This system sounds like it was designed to force you to buy air conditioners. Instead, place operable windows at the ceiling and away from prevailing winds where a negative air flow can siphon hot air right out of the room. Placing a tube under ground leading into your home, or allowing cool air into your basement, this siphoning effect can draw that cool air into the rest of the house as the heat escapes through the higher operable windows. No fan, no AC, no electricity needed.
  • Hugelkultur: Crappy soil? Gather up all your old logs and sticks and branches and leaves and pile them up (in that order from the ground up) then cover it with dirt and mulch and plant your garden on it. Mushrooms and other fungi break down the wood as it rots, It also holds in gobs of moisture, while still providing great drainage, and the composting of it all produces some heat, extending your growing season. If you're on a slope, dig your swale on the uphill side of it and you won't need to water as much.

More to come as I run across it.


Friday, June 12, 2015

Nice Double Herb Spiral

I found this idea here:

http://golemcoop.blogspot.com/2012/02/urban-permaculture-and-garden-design-v1.html

... and I'm totally stealing it!!!

Not on schedule

Though we really never had a solid start date, we had hoped to have broken ground by May. But life tends to roll itself in the way occasionally. Initially we planned to be able to hop into the van right after the kids got on the bus, work a few hours, then get home in time for them to get off the bus, but the oldest grandson started schooling at home, so someone had to be home with him to make sure he was logged in and working on school work. That's the first thing that slowed down progress.

Andrea was continuing her schooling, which won't be finished til August. When her catering job scheduled her 5 nights during the week and days on weekends, 7 days a week, 'on' a few weeks and 'off' a few, having only one vehicle with this kind of schedule makes building a house impossible.

There are good things about this. I've been apprehensive about the kind of roof I wanted to build. Having no carpentry experience, I didn't want to take on something I couldn't handle. Putting a roof on a round house isn't easy, especially doing so without planting a big ugly post in the middle of it. And my goal here is to build a house that anyone can build - with or without building skills. So this delay has given me more time to come up with a roof style I can work with, (to be posted here soon).

Most of our trips to Soulstice have included the kids, which means more time keeping them from hurting themselves in the woods, and less time measuring and observing. One thing we have observed is how windy it is there. This has advantages and disadvantages. We want to plant trees and sunflowers, but the wind can damage them while they're young, so windbreaks will need to be created. But if we can funnel the wind properly we can generate some kick-butt electricity from it, so wind turbines will need to be built to add to our solar panels. Drying clothes on the clothesline will be quicker too.

Another observation was that the soil is almost all clay where we want to build. Great for building, not for gardening. But sand is cheap, and the woods have plenty of material for hugel mounds, so we can compensate. But that soil test was only from the first foot of soil. Next trip I want to dig deeper to see what's under that.

We planted sunflowers and a blueberry bush last trip. I dug a small swale leading to the blueberry to make sure it gets well watered since we won't be there to water often enough. We just bought a peach tree the other day. Next trip down we'll leave the kids home with a babysitter and plant it - as well as do some measuring.

I discovered there's a lot more nice flat land on the west side of the creek. We'd failed to explore that area before. I like how it overlooks the creek. We discovered a lot of pawpaw trees along the west border also. An earlier romp at the beginning of spring revealed ramps also, lots of them. We'd like to cultivate more of those. That trip, we found Trilliums, bloodroot, dutchmans' britches, bigger maples, gobs of wild onion, blackberries and black raspberries.

We read that folks are harvesting sulphurous mushrooms (chicken of the woods) right now, so we may have to check on ours.

More soon.

Wednesday, March 18, 2015

Rocket Mass Heater Designs

I've done a lot of research on rocket stoves and rocket mass heaters --- to the point of obsession.Their design is ingenious. They've taken all the principles of all the masonry furnaces and wood stoves and created a marvel.

image cred: http://en.wikipedia.org
The first rocket stoves I saw were made by folks called "bushcrafters" - people who make useful stuff out of stuff they find. They'd use coffee cans or soup cans and arrange them so the fire burns hot and the heat goes directly to the cooking pot - very little heat is wasted. I thought it was a great idea for camping without having to take a camp stove and fuel along -- just use the wood from the surrounding camp - and not a lot of it either. The fire burns so hot you just need a little to get your food cooked.

I like a fire at night when I camp, but sometimes it's nice to just not have a fire at all - just let my eyes get accustomed to the dark and listen. I call it "using my radar" - where I just plop myself on a log and listen as intently and as far away as I can without the noisy crackling of a campfire, picking out all the faint, distant sounds and wondering what made them. Sometimes you hear coyotes, or a sampling of interesting owl songs. I once heard a mouse scurrying and squeaking in the cave I shared with it. These little coffee can rockets stoves burn just enough wood to cook on, so you can still have a hot meal on nights you want to enjoy the quiet.

image cred: http://www.inspirationgreen.com
So I thought these little soup-can stoves were the extent of it, until further investigation into rocket stoves revealed all sorts of designs, some that incorporated heavy insulation around the burn box for hotter fires, leading to an inverted 55 gallon steel drum that can radiate heat into your room like a wood stove. From there the introduction of cob sculpting took the design to amazing new heights! You can run the exhaust stovepipes through gobs of thick thermal mass (in the form of a long cob bench) horizontally - and then out a tall chimney all the way at the other end of the room - and the heat from the exhaust gets stored in the thermal mass bench along the way, releasing slowly into the room for hours after the fire's gone out.

I saw some of these in person -- one at the Mother Earth News Fair at Seven Springs PA and another in use at the Earthship at Blue Rock Station here in Ohio. The concept is simple, effective and the most efficient design in the world. You don't need to split wood and burn logs. You basically heat with kindling, creating fires so hot they don't even leave creosote, storing the heat in the thermal mass for hours. You can literally heat an efficient home (like the one we'll build) using the deadfall from a few acres of woods. Coppicing a willow or even using bamboo growing in old humanure compost can produce a steady supply of wood, too.

Though the fire burns super hot, by the time the heat from the exhaust reaches the other side of the room, it only heats up the vertical chimney to about 120 degrees or so, and there's so little smoke that folks in the city have piped these out their window and the neighbors don't even know there's a wood burning heater in the house. Good way to fly under the radar to avoid paying those nasty heating bills in cities that don't allow wood-burning heaters.

I love this illustration next. It gives you all the necessary proportions so you can tweak it to suit your home.
(compliments of Permies.com). See how you can just toss in long sticks and let them feed themselves into the fire at they burn down? After having heated with a woodstove in Hocking County for a few years, the thought of not having to split wood or constantly feed a fire is a comforting one. I plan to design my stove with a cage over the hot box so I can stack long branches that will self-feed the fire for longer periods of time, so I don't have to.


I'd like to build a small one under our bed so in winter we can burn a few sticks an hour before bedtime and let that heat rise slowly from under our bed.

This is great design for a kitchen stove:

 Soon after we talked together about using a cast iron griddle for a cooking surface, lo and behold a good friend just happened to buy us one for Christmas. This so far is closest to the design I'd like to use for our kitchen.


Monday, March 9, 2015

Rainwater Collection - updated 9/22/15

collectable rainwater (gallons) = 0.5 x rainfall (inches) x area (square feet) of collection surface

These parts get 41.2" a year, soooo.

0.541.280016480316.92307697.545787546

annual rainfallft² collection areagallons/yeargallons/weekgallons/day/person

This is if we create the first 2 buildings connected by a greenhouse. The roof space is estimated but we can also count things like carports or awnings as rainwater collectors also.

Every inch of space not used for growing is a potential rainwater collector. Every roof of your dwelling can collect your drinking, washing and bathing water. Your chicken coop can collect drinking water for your chickens. Putting up a canopy over where your dog hangs out can collect the rainwater that would otherwise create a mudhole that your dog would wallow in, creating more work for you when (s)he drags that mud through your house. Build him a nice outdoor shelter to keep his lounging area nice and dry and dusted with diatomaceous earth to minimize fleas and ticks, and use his canopy to fill his water bowl.

Using a compost toilet eliminates the need for flushing toilets so each person saves that 5 gallon/flush. Might do laundry at the laundromat the first year. The second year there'd be more collection area cuz we'll build more buildings. Showers will have to be quick 'navy showers' the first year. Watering gardens can come from rainwater collected off the land. If there's time a small plastic-lined dam at the bottleneck of the creek could serve as emergency backup.

Useful sites:
TheSelfSufficientLiving.com
Texas A&M screencast on rainwater harvesting (where I got the blue and white images for this blog) 

Some notes for potable water collection:
  • The slicker the roof the better, so that first flush scrapes off the initial debris. Best material is some kind of metal, like tin.
  • The steeper the better, to get all the nastiness off the roof in that first flush. . 
  • Make sure gutters keep water away from the house and slope towards the downspout, so water doesn't stand in it or rest against the eves of the roof.
  • Wide downspout.
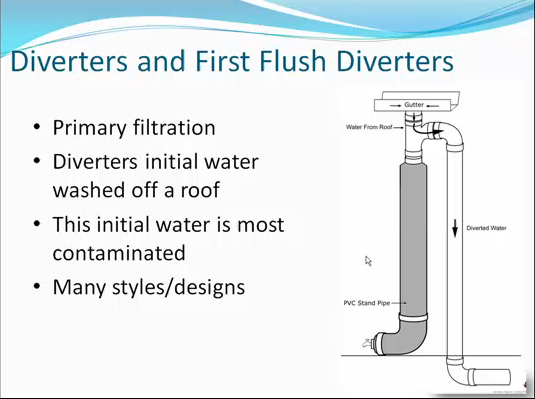
  • You'll need a first flush device. A straight pipe with a floating ball, with a slow leak in the bottom to slowly release the water after the rain, will fill up with that first flush then the ball can block the top, diverting the cleaner water into a side pipe leading into the storage tanks.
  • A screen should be placed just over the storage tank intake to catch the floating debris (like dead bugs).
  • The intake pipe leading into the storage tank should turn up so it doesn't disturb the sediment at the bottom of the tank.
  • The pipe leading out of the storage tank into the house, or the next tank, should have a screen and a float attached to take in water from somewhere below the surface and way above the bottom, to take in the least amount of whatever debris  may have entered the tank.
  • The overflow pipe should start at the bottom of the tank so if it lets out any excess water it'll do so from the bottom of the tank where any anaerobic debris may have settled.
  • You should use a wider outlet pipe than inlet to prevent backup.
  • Another outlet pipe can be a pipe cut at a 45° angle at the surface, removing whatever floating debris may have made its way into the storage tank.
  • Screen all openings to prevent critters from entering the tanks.
  • Divert overflow away from the tank to prevent it from eroding under the tank.
  • Multiple tanks prevents total loss should something happen to the main tank. Maybe have a system in place that prevents water from flowing the opposite direction into a previous tank, in case it becomes damaged.
  • Keep the water dark to prevent algae.
  • Filter using gradually-finer filters, then reverse osmosis for drinking water.
  • Solar pumps to move indoor water.
Maintenance:
  •  Spring means pollen - tree pollen can contain a lot of tannin. Shut off valves to barrels farther from the first barrel and check it for tannin content before allowing it to mix with stored water.
  • Build so checking for leaks is easy. Maybe taps under barrels funneling leaking water to an obvious place.


  • So our plan is to use the first flush technique shown above.
  • If we use multiple barrels(either mounted side-by-side or stacked on their sides) we can add as needed. 
  • Each barrel will need an external clear tube to measure levels so if there's a clog we can locate it.
  • If we transfer the water from barrel to barrel using a floating intake, by the time water reaches 2 or 3 barrels in, it should be really pure from particles, at least the floating and sinking kind.
  • Each barrel will need shutoff valves on both ends in case we have to clean or repair one.
  • Each barrel will need a drain to pull sediment from the bottom.
  • Any overflow should be directed towards a pond for cleaning.
  • If there is overflow, we should add another barrel. You can never store too much water.
  • We'll need to test often at first.
  • We're planning to use reverse osmosis for drinking water.
  • Separate barrel systems spread around the buildings can be a failsafe in case anything happens to one set, like a leak or contamination. If one set of barrels crashes we can get water from the others while repairing the damaged ones.
Update 9/22/15
 I just found this method for collecting rainwater containers. I may try to incorporate this into the array.
I'd put the overflow pipe on the end opposite the intake. Maybe put another overflow higher up on the original barrel in case the water comes in faster than it can flow into the next chamber.

I'm wondering if hooking the faucet up to all the barrels at once will increase water pressure.


Saturday, February 21, 2015

Permaculture Design Principles

My goal in life has never been to strike it rich. My goal has always been to just need less money.

In my studies I've learned a bit about permaculture design and I'll use this blog to explain some basics.
The main idea behind permaculture design, or sustainability design, is to eliminate waste and work by observing the events that happen in a naturally occurring system and redirecting them to do the work for you that would eliminate you having to feed energy into your own personal system.

In layman's terms - take the stuff that already happens in nature, and make it work for you.

Most civilized folks are pretty blind to all the stuff that goes on around them. Here's an example: When we were planning to buy cheap land in Maine we started reading the Bangor Daily News.

One of the stories described a power outage that was caused by a severe ice storm they were having. One of the victims of the outage that they interviewed was complaining that all the food in their freezer was going bad because the electricity had been out for weeks.

If you see my point, you're more aware than those folks :-)
If you don't know what I'm talking about right now, re-read the last paragraph until you do.

Unfortunately, permaculture design doesn't have a cut and dried instruction book. You can apply a technique to one yard and it'll work, but it may not work in another. It's like the meaning of life - you have to figure it out on your own.

Fortunately, there are design principles that are fairly universal.

So here are some things I learned.

Components of permaculture design
All of the elements listed below have properties that can be manipulated in some way to do work for you, at little or no cost.  I'll post another blog later, breaking them down if I get time.
These are the toys you have to work with.
  • Sun
  • Rainwater
  • Dew, mist and/or fog
  • wind
  • condensation
  • evaporation
  • reflection
  • thermal mass
  • decomposition
  • indigenous plants
  • garden plants
  • mushrooms
  • insects,arachnids
  • wild animals (birds, rodents, reptiles)
  • domestic animals (fish, chickens, goats)
  • stone, soil, clay
  • straw, mulch, fallen leaves and sticks, sawdust
  • seasons
  • terrain
  • structures you build to house you and your critters
  • things that can contain components (like water, stone, soil)
  • trash, things people give away on Craigslist, things you find that no one wants.
  • yard sale items, flea market items, things you can buy for next to nothing
  • colors, paints, dyes
  • daily habits
Whenever you look at your property, you should first look at where the sun hits throughout the day and year, from which direction the prevailing wind comes, and where water flows on your land (where is uphill and where is downhill). These set the main variables that affect where you need to go with your particular design. Once you determine this, you need to figure out how to slow the flow of sun and water through your land so you can gain the most use from them both.

Find out where energy hits your property and figure out how to 'catch' it.
Examples:

The Sun.
Gobs of sunlight hits your land every day. You can 'catch' it by planting food in every square foot of your property that gets sunlight - even partial sunlight. You can put big windows on the side of your house that gets the most sun and let it hit a stone, dark-stained floor that will absorb its heat and slowly release it when the room temperature cools. You can reflect and diffuse it to light up your rooms.

Rain:
Everything that can collect rain should collect rain. You can do this by digging swales at various altitudes along the contour of your land (that means perfectly horizontal) to stop runoff and allow rain to slowly soak into the soil, digging drains to direct that runoff, and ponds to hold that runoff At the fastest, water should flow through your property no faster than a slow stroll. You can collect rainwater from the roof of every building on your property and direct it into barrels, cisterns, indoor and outdoor ponds and aquariums, old bathtubs or jacuzzis, whatever will hold water, and store it for times when there is no rain. The more you can store, the longer you can hold out in a drought.

Now you can combine these two elements by directing some of that water right into a dark painted storage container, like a barrel, that's exposed to direct sunlight but also kept from the cold, like inside a window in your bathroom,. The sun gets absorbed by the dark painted container and heats the water it's holding. Now you've just cut back on whatever fuel you need to burn to heat your water, and whatever work you would have done chopping and hauling wood and building a fire, or working a job to buy whatever petroleum product you need to burn, by not having to raise the temperature of your water nearly as much as you'd have to by heating up cold water. Sometimes you wouldn't have to heat the water at all.

See what I mean?

Another trick is to take the fire you use to cook with and direct it through a water storage tank to heat the water you'll need to use to wash the dishes from that meal. A really good designer can find 4 or 5 uses for each thing  (s)he designs.

For example, you can catch water in a pond, run a small canal under your wall and into an indoor waterway where your fish can come in out of the cold in the winter time and swim around the perimeter of your living area. The pond and waterway both can serve as an environment to grow water-loving crops, while sustaining frogs and dragonflies outside that eat up mosquitos, and where geese and ducks come to poop and fertilize the food growing around the pond. The water containing the poop from the fish can be moved with solar pumps into an indoor aquaponic system, fertilizing the food crops growing indoors, which cleans the water and sends it back to the pond/aquarium waterway. The sun can shine on the waterway as it travels along your kitchen and dining room window, creating an aesthetic, peaceful atmosphere as its reflected sunlight dances across your ceiling, all the while heating the water in winter (when the sun is low) or cooling it when the sun is high and shaded by the house's overhanging roof, regulating your living area's temperature and humidity while increasing the biodiversity along the waterway. Watercress and other salad edibles can grow along the banks of your indoor waterway, supplying you with fresh salads for dinner. You can scrape off your dinner plates into the waterway where the fish from outside can come and eat your food scraps, saving you a walk to the compost bin outside in the snow and saving you from having to buy so much fish food.

Now how many uses can you find for that system?

Here are a few simpler tricks I picked up from seasoned permaculturalists.
  • Herb spirals are hills, 6ft wide and 3ft high. You can plant various herbs that each require a different type of environment because by creating a hill, you've created various micro-climates. The north face doesn't get as much sun and is cooler, so plant herbs there that like partial shade. The south face gets full sun and is warmer. The higher south face is dry, while the lower can drop into a pond and create a more warm, humid environment for planting more tropical herbs. The east gets morning sun, the west gets afternoon sun. See what I mean?
  • Plant in circles instead of rows. If you plant in rows, you have to find a way to get water all down the rows. But if you plant in circles, you can catch water in a barrel in the middle of that circle and let it out gradually, and the water source is equidistant from all the plants.
  • Create 'Keyhole' gardens. Either raise beds or dig ditches for walking on so you never have to step into your garden and you can garden til you're too old to stoop down. A keyhole garden is shaped just so - a path going into a circle. You can bring in your garden tools, plant all down both sides of the path and all around the circle without having to pick up all your stuff and move it down the row, like you would in a conventional garden. If you put a roof over the keyhole circle, you can catch the rainwater from it and use it to irrigate the plants from the center, just like the circle garden method mentioned above, and it also lets you garden or harvest in inclement weather. If you put your path leading into the circle on the uphill side of the circle, whatever rainwater runs off from uphill can be halted by the circle and fed under the garden beds to feed the plants around it. Now you've cut back on the work it would have taken to water the plants there too.
  • Timing can also be worked in as a design. Plant 3 or 4 crops all at once, fast growing plants like radishes along with leafy plants along with root plants that reach maturity in longer periods of time. One planting, 4 harvests.
  • Plant before you harvest the previous crop. Masanobu Fukuoka (the father of permaculture) would walk out into a field of one crop that was ready to harvest soon, then start seeding before he harvested the original crop. The original crop would protect the seeds from the eyes of flying critters, and from harsh sunlight that could overheat the soil (seeds don't need sun til they germinate). It would also keep moisture in the soil by creating a moist micro-climate, keeping water from evaporating away too quickly. Then when it came time to harvest the original crop, he'd just leave the rest of the plant to drop over the germinated seedlings, acting like a mulch to keep weeds from competing with the new seeds. Now he just saved all that time he otherwise would have spent dragging the old crop leftovers out of the garden, plowing, furrowing and laying down weed blocking stuff (like cardboard and newspaper, see later) and irrigating, and in doing so created a better environment for growing the new seedlings.
  • Before you plant the very first garden, layer newspaper and old plant waste and mulch in several layers like lasagna (they call it 'Lasagna Gardening'). The worms will eat the bottom layers and create wonderfully rich soil for the roots of your plants, and the layers will stop weeds before they beak the surface. It'll also hold in tons of moisture to eliminate most of your need to irrigate or water.
  • Making money and spending money uses way more time than saving money and trading. When you make money, you earn a certain amount, then you give 13.58% to the federal government for Income Tax, then when you spend it, you give an additional 6.75% (depending on where you live) to the government again in the form of Sales Tax. Using permaculture design always results in surplus food. If you grow your own food, you can trade your surplus for things you might otherwise buy. It's surplus so it didn't cost any more than the cost of the initial seeds and equipment. You'll already be benefiting from that the first year. So you trade surplus for, say, a rake. You're paying no tax for the food you traded, nor are you paying sales tax for the rake.
  • Use heirloom seeds and save your seeds. After you pull your first harvest you can save your seeds, replant them - even double your re-planting - and likely still have seeds left to swap for new varieties with other seed savers. Now you've saved all the money you would have spent on seeds for the next 100 years. Never buy seed again.
  • Plant in 'guilds' under trees. Guilds are plants that help each other to grow in some way. The 'three sisters' is the most famous guild - corn, beans and squash. the squash shades the ground and holds in the moisture, the corn provides a structure for the beans to climb, and the beans add nitrogen to the soil. When it rains on trees, the rain that rolls off, and through, the leaves is called 'throughfall'. Throughfall is the tree's bathwater. It's packed with nutrients absorbed from the leaves. The soil under the tree holds lots of water, too, which breeds lots of aquatic organisms, eating, pooping and fortifying the soil with even more nutrients. Planting under a tree feeds your garden like no other fertilizer. Trees create small micro-climates, cooling the air and preventing evaporation. Plant away from the trunk - out where the roots stretch to the edges of the leaves. Under your fruit or (some) nut trees, you can plant bushes, then on the south face of those bushes plant tall plants, then shorter then shorter, maybe adding a few flowers to bring in pollinators. You can drape string from the lower branches to support climbing plants. Another benefit of the trees is that it slows the flow of water from your land, holding water in the soil to be taken up by all your garden, and if you're lucky, over time they may even create a spring at the bottom of your hill.
  • Keep your chickens in a movable coop and set them in places you plan to plant a new garden in the spring. They'll plow up your dirt eating all the bugs and weed seed, then fertilize it with poop. Move them to the next area while you plant that one.
  • Let your goats graze near where you'd like to clear out some bramble. Goats can eat through stickers and poison ivy, and it's a lot easier than trying to cut that all up yourself. Be sure to keep them away from blackberry and black raspberry bushes. You can weave those along a line to create a natural fence around your property or garden.
  • Bury your ugly rotten logs in old leaves and dirt into big mounds and plant in them. The decomposition of all the wood matter under the ground breeds gobs of worms and mushrooms, which fertilizes the soil. It also holds in moisture, so you almost never have to water it. They call this method of gardening "Hugelkultur"
There are lots more and I'll probably blog them as I hear them. Feel free to add any you can think of in a comment.

6/12/2015 Update: Found a website specifically outlining Permaculture Design Principles:
http://permacultureprinciples.com/principles/