The layout.....
Showing posts with label Design. Show all posts
Saturday, June 27, 2020
Thursday, June 6, 2019
Plan D
The bus is on the lot!
It cost us $850 to get it here, and they broke an axle doing it, but it's here! The first thing we noticed when we got inside the bus a week or so after we towed it here was that it wasn't nearly as hot as we thought it would be, even sitting in full sun. The cross breeze coming in from the windows kept it pretty tolerable inside. Being painted white helped, I'm sure.
We did a bunch of planting while waiting for the rain to come, and when it did we took brushes and rags and soap and started scrubbing on the top of the bus. It was covered in tree sap and algae from being under the trees in the woods for so long, but it was coming off pretty easily. We didn't finish cleaning it that day because it's planting season and we had a lot to do. We'll work on it during the rainy days. Then we'll paint it - cuz it really needs it!
But on the sunny days we plan to start working on the bump out. It won't be attached to the bus as originally thought because there's a 2ft space between the bus and the grassy area, so we'll cantilever the roof out to cover at least the south half of the bus, so that the rain hitting the north half of the bus will roll off the north side, and the cantilevered roof will catch the water on the south side and add to the collection tanks.
We've reconsidered adding the water from the drain to the greywater trench. It's too risky letting the driveway water hit the greywater because vehicles are so toxic - especially old ones. So we'll fill that drainage ditch with mulch inoculated with King Stropharia mushrooms to clean up any runoff from the driveway. Fortunately it still ends several feet before the grey water treatment area.So as soon as we got the bus parked, the zoning inspector came by to take a look. I'm guessing we've got a Mrs Kravitz in the neighborhood who couldn't wait to let him know something was up.
He asked if we'd planned to stay in it, and we said yes. He said if we did, we were only allowed to stay in it for 3 months then we had to not stay in it for a month before we could stay in it again. He said he had to check to be sure, but we may even have to move it after that 3 months.
I could see that being the case in a public park but not on private land. Turned out later he checked with the county prosecutor and no such law existed.
Some time later the zoning inspector got a complaint, probably from that same neighbor, that we had a disabled vehicle on the property and a bunch of junk in the yard. We were told that we couldn't have a disabled vehicle in a residential area for more than 2 weeks unless it was kept in a building, like a pole building or garage. The problem with that was that the front of the bus was less than 40ft from the road. No permanent structures are permitted less than 40ft from the road. So the solution of building a pole barn around it would require asking for a variance.
That's when I asked for a 3rd time for a copy of the zoning ordinances. He printed one out for me on his home printer and stapled them all together for me for $10.
Upon discussing the matter the next visit I explained that the 'junk' the neighbor was talking about was a bed frame we were using as a trellis for out cucamelons and that people use them in trendy areas of the city all the time. I've even seen a bed frame used as a gate in Olde Towne East in Columbus. He was willing to let that go. But he asked if I'd like to come to a town meeting of the zoning committee and I agreed.
I was the first to be able to bring up my concern at the meeting. I explained how we were building a food forest and were planning to fix up and live in the bus while building our house. I told them if they wanted to go ahead and send me the formal charge in the mail I'd be happy to appeal it, which involved them posting something in the local paper (for which I'd be charged $10) and having a meeting with whomever in the township had anything to say about it, and they'd make their decision after that.
Some weeks later I received a phone call from the zoning inspector stating concern that I might not have enough room to put in a septic system and still build a house and a garden in the only level ground on the lot. We were beginning to think we weren't wanted here. I'll cover my plans to deal with that subject in a later post.
I'm posting all this here because these are the hurdles that occur when trying an alternate lifestyle. The laws are on the books for a reason. The trick is to understand first the spirit of the law, keep your cool, and just ask how to go about obeying the rules and still being able to do what we want to do. To us, the bus isn't a vehicle. It is being repurposed for a 'tiny home'. People do the same thing with shipping containers and train cabooses. I have a bedframe in my garden - doesn't mean I sleep there. So I'm ready to take it to court if need be.
That was all in June of 2019. Fast forward to June of 2020 and we have yet to be formally charged with any violation. So we don't plan to move the bus off the property or further into the lot. There's too little room to maneuver and we want to keep the east-west orientation to maximize solar gain for the attached greenhouse.
So plans to work on the bus have resumed. The plan now is to set 2ft long PVC pipes in cement in the ground beyond the 40ft mark, then bolt PVC pipes to it for a frame and stretch plastic across that frame - opaque on top and clear on the south wall - and attach the other end of the frame to the bus to secure it on the north side. So now the greenhouse won't be a permanent structure and neither will the bus.
We've been going down to the property on weekends and painting. We've been raising Andrea's grandson since November so with the coronavirus pandemic daycare had been closed for a couple months. They just reopened last month so we've had more time. I finished adding the blue earlier this week, after painting the roof white last weekend while Andrea painted inside.
It's looking much better, we think.
Thursday, August 30, 2018
Don't Kill the Weeds in your Garden --- USE THEM!
Warning....
This is not another blog about the medicinal properties of dandelions and plantains. If you're reading this you likely know all that stuff already.
This is completely new and different.
Introduction:
Weeds!
Gardeners hate them.
They pull them,
dig them,
poison them,
chop them,
they want them OUT of their garden.
But more than once I've observed something that makes me wonder if these corporations that sell weed killing chemicals and gadgets are telling us how terrible weeds are in order to sell you their weed killing chemicals and gadgets.
Maybe, just maybe, weeds are actually our friends?
Read on.....
So we're out in our field, checking out the plants that we'd planted the season before, only to find - or NOT find - a lot of our plants.
No, they didn't get eaten. They didn't die. They didn't grow legs and run away. They were buried in weeds. Tall weeds! Weeds taller than us!
We live (rent) an hour from Soulstice Homestead, so we don't currently get to work out there more than the occasional Sunday we have free. So when we're there, we focus first on planting long-term perennials like fruit trees, nut trees and berry bushes and pollinator attractors. But it's tough to keep on top of the progress of our plantings when there can sometimes be a few weeks between visits.
So, like I said, we're out in our field, checking out the plants we'd planted the season before, and Andrea's like "Hey. I think we're missing some blueberry plants". We looked through the weeds where we thought they were planted, but yeah, it looked like we were short a couple. We assumed maybe they'd gotten eaten by deer or something.
So a couple weeks later we went back to that blueberry patch to add some coffee grounds we'd snagged from a local Starbucks and while clearing out more weeds, we saw another blueberry plant. Only this one was greener, brighter, bigger and healthier than the ones we'd uncovered the previous visit. Then as we uncovered another, we saw that it was healthier looking too!
We live (rent) an hour from Soulstice Homestead, so we don't currently get to work out there more than the occasional Sunday we have free. So when we're there, we focus first on planting long-term perennials like fruit trees, nut trees and berry bushes and pollinator attractors. But it's tough to keep on top of the progress of our plantings when there can sometimes be a few weeks between visits.
So, like I said, we're out in our field, checking out the plants we'd planted the season before, and Andrea's like "Hey. I think we're missing some blueberry plants". We looked through the weeds where we thought they were planted, but yeah, it looked like we were short a couple. We assumed maybe they'd gotten eaten by deer or something.
So a couple weeks later we went back to that blueberry patch to add some coffee grounds we'd snagged from a local Starbucks and while clearing out more weeds, we saw another blueberry plant. Only this one was greener, brighter, bigger and healthier than the ones we'd uncovered the previous visit. Then as we uncovered another, we saw that it was healthier looking too!
Another weekend we dug through some 7ft high Johnson grass and thistle where we had planted some roses and, thinking they were probably overrun, found that they, too, were really surprisingly healthy!
This sparked a theory...
- Maybe, the weeds actually created an environment that both protected and fed the blueberry and rose plants.
- Maybe, uncovering the other blueberry plants exposed them to pests and the elements - like too much sun and too much wind, telling the deer "Hey, look at us! We look all different from everything else why don't you come over here and eat us!"
- Maybe, being covered in weeds might still let in enough sunlight to allow for photosynthesis.
- Maybe, the canopy of weeds created a little ecosystem that kept the plants from overheating, despite the 90°+, and held in moisture.
- Maybe the roots of the weeds perpetuated the microbial activity that were already established there, and maybe that microbial activity welcomed the new blueberries and roses into their ecosystem.
- Ever notice when you stick your face in the weeds how nice it smells? All rich and "green" and planty like? Maybe the air given off by the other plants feeds the plants around it.
Weeds and grasses are like bandaids for damaged land. They get their roots in as best they can and start to create some rudimentary bio system as a base on which to build more lush plant life. And the more plants cover a land, the richer it becomes, each year dropping more leaves and biological material that break down, feed bugs and worms, and feed the next year's growth.
When we observe how something works in our environment, we want to try to understand why it works, then apply those principles to our overall design.
This is how permaculture works.
The Test:
We live (rent) an hour away from our land, on a lot which is completely shaded by the neighbor's giant pine trees. So we found another way to garden this year. We were loaned a small space at a good friend's house close to where we rent. They plowed and tossed in a little composted horse manure for us, and that's what we had to work with. The soil itself wasn't very rich or dark, but the manure gave it potential.
- Planted some tomatoes, peppers, tomatillos, melons and some brussel sprouts
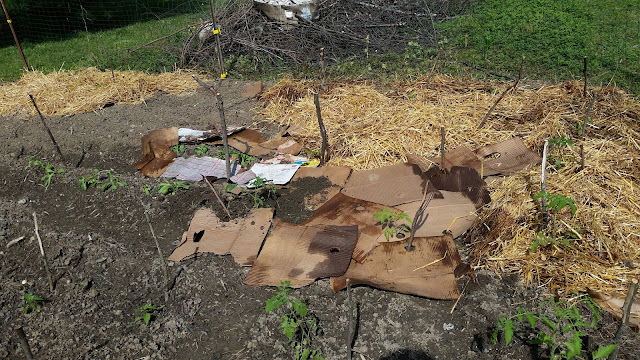
- Laid down some old, wet, kinda rotten cardboard around the plants
- Tossed on a thick layer of straw from the goats' stall - so it had goat pellets and pee in it but had had time to compost a bit.
- Watered the heck out of them.
- A couple weeks later we planted basil between the tomatoes and peppers.
![]() |
| Adding the straw |
Despite the cardboard and straw barrier, a lot of weeds still worked their way out, but not before the garden had time to grow first. So the weeds took a while before they began to outgrow the plants.
By the time the weeds started to catch up to the plants, I could go through and pick out the strangly viney stuff (bindweed) that was trying to cling to the tomatoes, and clip down some fast growing grasses to create more soil coverage and worm food.
As the weeds started to appear to take over the garden, I Peered between them to locate my plantings, and selectively I would observe how each plant was being affected by its surrounding weeds.
And it was really interesting!
I observed that some really tall weeds with sturdy stalks were holding up the tomato plants and the sugar baby watermelons.
I saw that there were Japanese beetles that were eating... not our tomatoes and peppers and basil... but the adjacent weeds, ignoring our plants like they were nasty tasting or something.
I noticed deep down that, despite the heat and lack of rain the past few days, the ground, and the air inside the weeds was still moist and rich and fragrant.
And our plants were doing just fine!
Once the weeds got taller than the plants, I trimmed down the weeds that blocked the sun from individual plants, just those on the south side of each plant, and only maybe halfway down, so the sun shown through onto our plants. The lower half of the weeds still supported the mini atmosphere they were creating near the ground.
I'd trim away the bindweed that tried to wrap itself around our plants, but I'd leave them alone if they were entwined around the weeds because they formed a reinforcing weave that made the surrounding weeds more sturdy, so they would better support our plants.
And support they needed! Our tomatoes produced so much they were toppling their cages and I couldn't keep them upright. I had to slip rocks and pavers under the tomatoes whose branches were interwoven at ground level so they wouldn't rot. I propped other tomato plants up against the more rigid weeds and wound them around them for extra support.
Our plants produced a LOT of food... As much if not more than the laborious traditional method of gardening.

![]() |
| Hunting for the food among the weeds was like a treasure hunt |

Conclusion:
This experiment worked better than I had hoped, and I learned a lot from it. My goal was to mimic the lush environment of a thick field of weeds and work with the native ecosystem rather than try to dominate and suppress it.
One of the founding fathers of permaculture, Bill Mollison, felt that gardens should mimic the natural environment, and I'd always felt that way too, which I guess is what drew me to this philosophy.
This successful trial showed me up close how plants can support each other. When you walk up to the garden from outside the fence, it looks like an old abandoned weed patch. That alone protects the plants from passing deer.
The distraction of all the other weeds act as food for rabbits and chipmunks and other animals that would normally be devouring garden plants that were laid out in +in a traditional bare rowed garden. In return, they poop in the soil, contributing nutrients as a sort of payment for the meal.
Actually the only vegetables that got eaten by critters other than us were on the perimeter of the garden...except the brussel sprouts...which suggests that this method may not work the same for all plants. However, I know of some more traditional gardeners whose brussel sprouts were also attacked. (see fix below)
The rich and fragrant air when you put your face down into the weeds suggests to me that the soil is like a small rainforest during hot summer days. Compare that to a bare rowed traditional garden on the same day who's parched dirt would be begging to be watered.
And mind you I had never watered this garden at all this summer, aside from the very first planting and covering it all with cardboard and straw when the weeds were covered and things were initially pretty exposed to the elements. (see fix below)
In fact, aside from cutting back weeds maybe 3 times all summer, this was a remarkably maintenance free garden.
Mistakes:
So yeah I made a few.. .
I didn't use strong enough tomato cages.
I didn't anticipate so much food production so some of it ended up rotting in the straw.
I didn't create supports ahead of time for the vining plants, although some used the surrounding fence for support.
I wasn't there to watch my brussel sprouts that got eaten early by something. But I did take photos and researched what it was and their lifecycle so maybe next year I can prepare better for them.
What I'll do next year :
- To start, I'll lay the cardboard, etc. more like Geoff does it in his videos. I failed to add table scraps under the cardboard this time. I think they would have better fed the worms and created a richer soil. I'd also plant after the cardboard is laid... cutting holes in it to plant.
- I'd water the soil before I laid the cardboard. I think the cardboard and mulch sucked up a lot of the water from the soil and the plants never got the advantage of getting soaked first.
- I'd wet the cardboard first so it's wet on both sides all the way through before I lay it down. I think in some areas it wasn't fully saturated and puckered up in the beginning when it didn't rain for a few days.
- I'd mulch with leaves as well as straw. I recently learned that straw can dry out soil, or at least not hold in moisture as well. Leaves break down better than straw, and I believe would nourish the soil faster.
- So my real goal is to make this garden as corporate free, maintenance free and as commercial free, as I can. Note all the sticks sticking out between the plants. Those have the plant names on them. Tomato cages are nice, if Better Homes and Gardens plans on stopping by and using your tomatoes to sell their magazine. But I think I'll pass on the cages altogether next year.
- Instead, after I lay down the cardboard, leaves and straw, I'd toss a thick (at least 6") layer of medium size branches all over the garden. By medium size I mean maybe anywhere from 1/8" to 1/2" thick, 1 to 3 ft long, and I would lay a blanket of them. This would create a support for the tomatoes and melons that wouldn't get "knocked down" by the wind, and would keep the fruiting bodies off the soil, high and dry, but still protected by the lush environment of the weeds' nurturing ecosystem. So it would be OK if the tomatoes grew on the ground, because there'd still be air under them and they'd be less likely to rot. One thing that was a little frustrating was that there'd be many big juicy tomatoes lying on the ground but I couldn't lift the branches up without breaking them. This would make supporting them unnecessary.
- An added benefit to the branches would be the mycological environment it would create. It's only recently that we've discovered the intimate relationships between mushrooms and plants, and I think the sticks settling into the moist environment of the weeds would promote fungal growth rapidly.
- I'd cut the weeds down more after the veggies started to ripen to release some of the moisture. Too much moisture might promote rot.
Labels:
Design,
ecosystems,
garden,
microclimate,
peppers,
permaculture,
tomatoes,
weeds
Sunday, September 4, 2016
Great New Goat Hay-Feeder
So when we first got Cinnamon and Laverne, we'd feed them hay and the next day find it trampled, pooped in and peed on in their pen. Couldn't figure out why.
Then Andrea read on a homesteading website that goats won't eat their hay if it's on the ground. They're browsers, and like to eat things that are bush- and branch-level.
We talked about putting together some 2x4's and some netting or chicken wire or wooden slats to make our pygmy goats something to eat out of so we didn't waste hay. Since we haven't had a lot of time, we didn't get around to that yet, and the next morning I went out to let the goats out to browse and, looking over at our brush pile that never got burned, I got the idea....
The brush pile makes a great feeder. It keeps the hay high and dry, and any that falls out just gets caught by smaller branches. They eat every bit of their hay now, and run to the brush pile every time I let them out to browse.
(Shhh - Zion thinks she's a goat - don't tell her. She'll be out there eating grass right alongside them, when she isn't getting headbutted by Cinnamon.
Then Andrea read on a homesteading website that goats won't eat their hay if it's on the ground. They're browsers, and like to eat things that are bush- and branch-level.
We talked about putting together some 2x4's and some netting or chicken wire or wooden slats to make our pygmy goats something to eat out of so we didn't waste hay. Since we haven't had a lot of time, we didn't get around to that yet, and the next morning I went out to let the goats out to browse and, looking over at our brush pile that never got burned, I got the idea....
The brush pile makes a great feeder. It keeps the hay high and dry, and any that falls out just gets caught by smaller branches. They eat every bit of their hay now, and run to the brush pile every time I let them out to browse.
(Shhh - Zion thinks she's a goat - don't tell her. She'll be out there eating grass right alongside them, when she isn't getting headbutted by Cinnamon.
Saturday, February 21, 2015
Permaculture Design Principles
My goal in life has never been to strike it rich. My goal has always been to just need less money.
In my studies I've learned a bit about permaculture design and I'll use this blog to explain some basics.
The main idea behind permaculture design, or sustainability design, is to eliminate waste and work by observing the events that happen in a naturally occurring system and redirecting them to do the work for you that would eliminate you having to feed energy into your own personal system.
In layman's terms - take the stuff that already happens in nature, and make it work for you.
Most civilized folks are pretty blind to all the stuff that goes on around them. Here's an example: When we were planning to buy cheap land in Maine we started reading the Bangor Daily News.
One of the stories described a power outage that was caused by a severe ice storm they were having. One of the victims of the outage that they interviewed was complaining that all the food in their freezer was going bad because the electricity had been out for weeks.
If you see my point, you're more aware than those folks :-)
If you don't know what I'm talking about right now, re-read the last paragraph until you do.
Unfortunately, permaculture design doesn't have a cut and dried instruction book. You can apply a technique to one yard and it'll work, but it may not work in another. It's like the meaning of life - you have to figure it out on your own.
Fortunately, there are design principles that are fairly universal.
So here are some things I learned.
Find out where energy hits your property and figure out how to 'catch' it.
Examples:
The Sun.
Gobs of sunlight hits your land every day. You can 'catch' it by planting food in every square foot of your property that gets sunlight - even partial sunlight. You can put big windows on the side of your house that gets the most sun and let it hit a stone, dark-stained floor that will absorb its heat and slowly release it when the room temperature cools. You can reflect and diffuse it to light up your rooms.
Rain:
Everything that can collect rain should collect rain. You can do this by digging swales at various altitudes along the contour of your land (that means perfectly horizontal) to stop runoff and allow rain to slowly soak into the soil, digging drains to direct that runoff, and ponds to hold that runoff At the fastest, water should flow through your property no faster than a slow stroll. You can collect rainwater from the roof of every building on your property and direct it into barrels, cisterns, indoor and outdoor ponds and aquariums, old bathtubs or jacuzzis, whatever will hold water, and store it for times when there is no rain. The more you can store, the longer you can hold out in a drought.
Now you can combine these two elements by directing some of that water right into a dark painted storage container, like a barrel, that's exposed to direct sunlight but also kept from the cold, like inside a window in your bathroom,. The sun gets absorbed by the dark painted container and heats the water it's holding. Now you've just cut back on whatever fuel you need to burn to heat your water, and whatever work you would have done chopping and hauling wood and building a fire, or working a job to buy whatever petroleum product you need to burn, by not having to raise the temperature of your water nearly as much as you'd have to by heating up cold water. Sometimes you wouldn't have to heat the water at all.
See what I mean?
Another trick is to take the fire you use to cook with and direct it through a water storage tank to heat the water you'll need to use to wash the dishes from that meal. A really good designer can find 4 or 5 uses for each thing (s)he designs.
For example, you can catch water in a pond, run a small canal under your wall and into an indoor waterway where your fish can come in out of the cold in the winter time and swim around the perimeter of your living area. The pond and waterway both can serve as an environment to grow water-loving crops, while sustaining frogs and dragonflies outside that eat up mosquitos, and where geese and ducks come to poop and fertilize the food growing around the pond. The water containing the poop from the fish can be moved with solar pumps into an indoor aquaponic system, fertilizing the food crops growing indoors, which cleans the water and sends it back to the pond/aquarium waterway. The sun can shine on the waterway as it travels along your kitchen and dining room window, creating an aesthetic, peaceful atmosphere as its reflected sunlight dances across your ceiling, all the while heating the water in winter (when the sun is low) or cooling it when the sun is high and shaded by the house's overhanging roof, regulating your living area's temperature and humidity while increasing the biodiversity along the waterway. Watercress and other salad edibles can grow along the banks of your indoor waterway, supplying you with fresh salads for dinner. You can scrape off your dinner plates into the waterway where the fish from outside can come and eat your food scraps, saving you a walk to the compost bin outside in the snow and saving you from having to buy so much fish food.
Now how many uses can you find for that system?
Here are a few simpler tricks I picked up from seasoned permaculturalists.
6/12/2015 Update: Found a website specifically outlining Permaculture Design Principles:
http://permacultureprinciples.com/principles/
In my studies I've learned a bit about permaculture design and I'll use this blog to explain some basics.
The main idea behind permaculture design, or sustainability design, is to eliminate waste and work by observing the events that happen in a naturally occurring system and redirecting them to do the work for you that would eliminate you having to feed energy into your own personal system.
In layman's terms - take the stuff that already happens in nature, and make it work for you.
Most civilized folks are pretty blind to all the stuff that goes on around them. Here's an example: When we were planning to buy cheap land in Maine we started reading the Bangor Daily News.
One of the stories described a power outage that was caused by a severe ice storm they were having. One of the victims of the outage that they interviewed was complaining that all the food in their freezer was going bad because the electricity had been out for weeks.
If you see my point, you're more aware than those folks :-)
If you don't know what I'm talking about right now, re-read the last paragraph until you do.
Unfortunately, permaculture design doesn't have a cut and dried instruction book. You can apply a technique to one yard and it'll work, but it may not work in another. It's like the meaning of life - you have to figure it out on your own.
Fortunately, there are design principles that are fairly universal.
So here are some things I learned.
Components of permaculture design
All of the elements listed below have properties that can be manipulated in some way to do work for you, at little or no cost. I'll post another blog later, breaking them down if I get time.
These are the toys you have to work with. - Sun
- Rainwater
- Dew, mist and/or fog
- wind
- condensation
- evaporation
- reflection
- thermal mass
- decomposition
- indigenous plants
- garden plants
- mushrooms
- insects,arachnids
- wild animals (birds, rodents, reptiles)
- domestic animals (fish, chickens, goats)
- stone, soil, clay
- straw, mulch, fallen leaves and sticks, sawdust
- seasons
- terrain
- structures you build to house you and your critters
- things that can contain components (like water, stone, soil)
- trash, things people give away on Craigslist, things you find that no one wants.
- yard sale items, flea market items, things you can buy for next to nothing
- colors, paints, dyes
- daily habits
Find out where energy hits your property and figure out how to 'catch' it.
Examples:
The Sun.
Gobs of sunlight hits your land every day. You can 'catch' it by planting food in every square foot of your property that gets sunlight - even partial sunlight. You can put big windows on the side of your house that gets the most sun and let it hit a stone, dark-stained floor that will absorb its heat and slowly release it when the room temperature cools. You can reflect and diffuse it to light up your rooms.
Rain:
Everything that can collect rain should collect rain. You can do this by digging swales at various altitudes along the contour of your land (that means perfectly horizontal) to stop runoff and allow rain to slowly soak into the soil, digging drains to direct that runoff, and ponds to hold that runoff At the fastest, water should flow through your property no faster than a slow stroll. You can collect rainwater from the roof of every building on your property and direct it into barrels, cisterns, indoor and outdoor ponds and aquariums, old bathtubs or jacuzzis, whatever will hold water, and store it for times when there is no rain. The more you can store, the longer you can hold out in a drought.
Now you can combine these two elements by directing some of that water right into a dark painted storage container, like a barrel, that's exposed to direct sunlight but also kept from the cold, like inside a window in your bathroom,. The sun gets absorbed by the dark painted container and heats the water it's holding. Now you've just cut back on whatever fuel you need to burn to heat your water, and whatever work you would have done chopping and hauling wood and building a fire, or working a job to buy whatever petroleum product you need to burn, by not having to raise the temperature of your water nearly as much as you'd have to by heating up cold water. Sometimes you wouldn't have to heat the water at all.
See what I mean?
Another trick is to take the fire you use to cook with and direct it through a water storage tank to heat the water you'll need to use to wash the dishes from that meal. A really good designer can find 4 or 5 uses for each thing (s)he designs.
For example, you can catch water in a pond, run a small canal under your wall and into an indoor waterway where your fish can come in out of the cold in the winter time and swim around the perimeter of your living area. The pond and waterway both can serve as an environment to grow water-loving crops, while sustaining frogs and dragonflies outside that eat up mosquitos, and where geese and ducks come to poop and fertilize the food growing around the pond. The water containing the poop from the fish can be moved with solar pumps into an indoor aquaponic system, fertilizing the food crops growing indoors, which cleans the water and sends it back to the pond/aquarium waterway. The sun can shine on the waterway as it travels along your kitchen and dining room window, creating an aesthetic, peaceful atmosphere as its reflected sunlight dances across your ceiling, all the while heating the water in winter (when the sun is low) or cooling it when the sun is high and shaded by the house's overhanging roof, regulating your living area's temperature and humidity while increasing the biodiversity along the waterway. Watercress and other salad edibles can grow along the banks of your indoor waterway, supplying you with fresh salads for dinner. You can scrape off your dinner plates into the waterway where the fish from outside can come and eat your food scraps, saving you a walk to the compost bin outside in the snow and saving you from having to buy so much fish food.
Now how many uses can you find for that system?
Here are a few simpler tricks I picked up from seasoned permaculturalists.
- Herb spirals are hills, 6ft wide and 3ft high. You can plant various herbs that each require a different type of environment because by creating a hill, you've created various micro-climates. The north face doesn't get as much sun and is cooler, so plant herbs there that like partial shade. The south face gets full sun and is warmer. The higher south face is dry, while the lower can drop into a pond and create a more warm, humid environment for planting more tropical herbs. The east gets morning sun, the west gets afternoon sun. See what I mean?
- Plant in circles instead of rows. If you plant in rows, you have to find a way to get water all down the rows. But if you plant in circles, you can catch water in a barrel in the middle of that circle and let it out gradually, and the water source is equidistant from all the plants.
- Create 'Keyhole' gardens. Either raise beds or dig ditches for walking on so you never have to step into your garden and you can garden til you're too old to stoop down. A keyhole garden is shaped just so - a path going into a circle. You can bring in your garden tools, plant all down both sides of the path and all around the circle without having to pick up all your stuff and move it down the row, like you would in a conventional garden. If you put a roof over the keyhole circle, you can catch the rainwater from it and use it to irrigate the plants from the center, just like the circle garden method mentioned above, and it also lets you garden or harvest in inclement weather. If you put your path leading into the circle on the uphill side of the circle, whatever rainwater runs off from uphill can be halted by the circle and fed under the garden beds to feed the plants around it. Now you've cut back on the work it would have taken to water the plants there too.
- Timing can also be worked in as a design. Plant 3 or 4 crops all at once, fast growing plants like radishes along with leafy plants along with root plants that reach maturity in longer periods of time. One planting, 4 harvests.
- Plant before you harvest the previous crop. Masanobu Fukuoka (the father of permaculture) would walk out into a field of one crop that was ready to harvest soon, then start seeding before he harvested the original crop. The original crop would protect the seeds from the eyes of flying critters, and from harsh sunlight that could overheat the soil (seeds don't need sun til they germinate). It would also keep moisture in the soil by creating a moist micro-climate, keeping water from evaporating away too quickly. Then when it came time to harvest the original crop, he'd just leave the rest of the plant to drop over the germinated seedlings, acting like a mulch to keep weeds from competing with the new seeds. Now he just saved all that time he otherwise would have spent dragging the old crop leftovers out of the garden, plowing, furrowing and laying down weed blocking stuff (like cardboard and newspaper, see later) and irrigating, and in doing so created a better environment for growing the new seedlings.
- Before you plant the very first garden, layer newspaper and old plant waste and mulch in several layers like lasagna (they call it 'Lasagna Gardening'). The worms will eat the bottom layers and create wonderfully rich soil for the roots of your plants, and the layers will stop weeds before they beak the surface. It'll also hold in tons of moisture to eliminate most of your need to irrigate or water.
- Making money and spending money uses way more time than saving money and trading. When you make money, you earn a certain amount, then you give 13.58% to the federal government for Income Tax, then when you spend it, you give an additional 6.75% (depending on where you live) to the government again in the form of Sales Tax. Using permaculture design always results in surplus food. If you grow your own food, you can trade your surplus for things you might otherwise buy. It's surplus so it didn't cost any more than the cost of the initial seeds and equipment. You'll already be benefiting from that the first year. So you trade surplus for, say, a rake. You're paying no tax for the food you traded, nor are you paying sales tax for the rake.
- Use heirloom seeds and save your seeds. After you pull your first harvest you can save your seeds, replant them - even double your re-planting - and likely still have seeds left to swap for new varieties with other seed savers. Now you've saved all the money you would have spent on seeds for the next 100 years. Never buy seed again.
- Plant in 'guilds' under trees. Guilds are plants that help each other to grow in some way. The 'three sisters' is the most famous guild - corn, beans and squash. the squash shades the ground and holds in the moisture, the corn provides a structure for the beans to climb, and the beans add nitrogen to the soil. When it rains on trees, the rain that rolls off, and through, the leaves is called 'throughfall'. Throughfall is the tree's bathwater. It's packed with nutrients absorbed from the leaves. The soil under the tree holds lots of water, too, which breeds lots of aquatic organisms, eating, pooping and fortifying the soil with even more nutrients. Planting under a tree feeds your garden like no other fertilizer. Trees create small micro-climates, cooling the air and preventing evaporation. Plant away from the trunk - out where the roots stretch to the edges of the leaves. Under your fruit or (some) nut trees, you can plant bushes, then on the south face of those bushes plant tall plants, then shorter then shorter, maybe adding a few flowers to bring in pollinators. You can drape string from the lower branches to support climbing plants. Another benefit of the trees is that it slows the flow of water from your land, holding water in the soil to be taken up by all your garden, and if you're lucky, over time they may even create a spring at the bottom of your hill.
- Keep your chickens in a movable coop and set them in places you plan to plant a new garden in the spring. They'll plow up your dirt eating all the bugs and weed seed, then fertilize it with poop. Move them to the next area while you plant that one.
- Let your goats graze near where you'd like to clear out some bramble. Goats can eat through stickers and poison ivy, and it's a lot easier than trying to cut that all up yourself. Be sure to keep them away from blackberry and black raspberry bushes. You can weave those along a line to create a natural fence around your property or garden.
- Bury your ugly rotten logs in old leaves and dirt into big mounds and plant in them. The decomposition of all the wood matter under the ground breeds gobs of worms and mushrooms, which fertilizes the soil. It also holds in moisture, so you almost never have to water it. They call this method of gardening "Hugelkultur"
6/12/2015 Update: Found a website specifically outlining Permaculture Design Principles:
http://permacultureprinciples.com/principles/
Wednesday, January 14, 2015
Clerestory Windows, Lofts and Logs
I was checking out some earthship videos and saw this one about a New Zealand earthship style home that's much smaller than the standard earthship, but had a design feature I'd like to consider.
We had originally intended to create a loft, but we were thinking more along the lines of adding the loft to the back half of the yurt-shaped building about 7 ft up to serve as a sleeping area, since there would be the dome-shaped or cone-shaped roof and ceiling, leaving space beneath for play and living.having the south-facing windows only come up to the bottom of that loft.
This design creates more solar gain by adding windows above the gutter line - and it looks fairly easy, using a simple dome/vault design.
Since we'll be using mostly found materials to build, meaning we won't be creating custom shaped windows, we're more likely to create the windows to be more square. We're still working on design in 3D and we'll detail that in a future post. But in the mean time, I found another great video, this one by Michael Reynolds, creator of the earthship, that explains many of the building techniques we'll try to implement using 3D animation
This was another video we found in the same surf that implemented logs off the property to support the roof, which is another option we'd like to consider...
Using logs would save gobs of money otherwise blown on lumber (not to mention the carbon footprint of having it hauled to our place). On this mini earthship they used it to support the roof, but we could create the dome as our main roof and just use our smaller, under-9-inch-diameter logs to support the loft. Shims could be used from other wood scraps to level up the flooring, if we even wanted it level. But then, flooring is overrated sometimes.
Thursday, January 8, 2015
Repurposing Saves Money
Money not spent is money not taxed. That's why saving money is better than earning it. No one can take away the money you saved. Many things you take for granted and/or consider trash can be used for things they were never intended for, and do a better job than what you would pay stupid prices for to get new.
Designing a permaculture homestead that needs the least amount of energy and work to maintain requires a lot of planning and design. If you don't use your head, you'll use your feet, and the idea behind this homestead is to create an environment where all our needs are met with little or no work involved with the least amount of money spent as possible.
For example, building a rocket mass heater may require you to gather wood to burn, but you don't have to split it and you don't have to pay money to have someone bring you cords of split hardwoods. You simply gather fallen sticks and branches and stack a few at a time vertically into the burn box and they'll feed themselves into the fire and break themselves up into hot coals as the fire burns. No splitting, no stirring, no adjusting logs. You don't even have to buy the heater. You build it out of cob and (hopefully) found scrap materials. We mentioned to everyone how much we love cast iron cookware, and lo and behold a wonderful person bought us a cast iron griddle that will work perfectly for the stovetop of out rocket mass heater. We've found bricks on craigslist for free, and now we're looking for firebrick.
Another example? Instead of building fences around each garden area to keep the deer and rabbits out, you build a double fence around the entire perimeter of the land and let your dog run along it and chase away the deer and rabbits before they get in, and pee along it so the smell also helps deter would-be veggie thieves. Dog gets exercise and you keep more of your food.
Design can work in every aspect of your life on the homestead. But before you design, you'll need to know not only what materials you have to work with, but what properties those materials possess and how they can be used to save you work. If you are smart, you can use free materials for everything. The more free stuff you use, the less work you have to do to make the money to spend on the not-free stuff. After all, that's what this whole blog is about.
I'm compiling a list here for my own reference (most of this blog is actually our recordkeeping, which we hope helps others in their process too)
Insulation:
Building
Hot tubs and bathtubs can be used to store water both above ground and below grade. They can be linked together and filled from various rainwater catchment systems. You can fill them with gravel and grow water loving plants in them. You can filter grey water (especially if you're vegan like us and have no grease in your sink water) by running it through one planted tub, then another, and another, some with fish, some swampy.
You can use old box springs or chain link fencing for trellises and arbors.
Rammed earth tires (at 300lbs each) can be used to level off driveways and patios, build walls, shore up creek banks to support bridges, build dams and hold ponds.
Cans and bottles can be laid in a cob mortar like bricks then plastered over to form thinner walls and interior walls. Bottles (especially colorful ones) can be used on the south, east and west walls to allow in light to showers, breakfast nooks, kitchens and bedrooms.
Shelves: You can never have enough shelves. Homesteaders need them to store canned stuff, dried stuff, seed starters, fresh food, supplies, create storage walls separate rooms for bedrooms. Watch craigslist and curbside for these and snatch them up whenever you see them.
Windows - ALWAYS grab windows if you see them on the curbs on trash day or on Craigslist. You can always find a use for them. Cold frames, small greenhouses, solar gain for animal houses (and people houses), solar ovens, poop cookers to kill bacteria before composting poop, solar hot water heaters, solar dehydrators. Windows are some of the biggest expenses in building your home. If you have the windows on hand, you can custom build your walls to support any size windows you happen to have found.
Branches: You can save a lot of money building things out of branches. Using baling twine, you can create wattle and daub fences and pet shelters. I use them in place of tomato stakes because they branch out like the tomato plants do and give you plenty to hold your veggies up with - for beans, toms, any climbing viney plants. Tie and weave them together low to the ground and you can support your squash and melons and other ground-crawlers up off the ground so they don't rot.
Andrea found a washing machine drum, stuck a pole in it and a bicycle wheel on top of that, ran string off it and made a great planter out of it. The holes in the sides help the soil drain and running strings off the bicycle wheel gives the plants something to climb.
Designing a permaculture homestead that needs the least amount of energy and work to maintain requires a lot of planning and design. If you don't use your head, you'll use your feet, and the idea behind this homestead is to create an environment where all our needs are met with little or no work involved with the least amount of money spent as possible.
For example, building a rocket mass heater may require you to gather wood to burn, but you don't have to split it and you don't have to pay money to have someone bring you cords of split hardwoods. You simply gather fallen sticks and branches and stack a few at a time vertically into the burn box and they'll feed themselves into the fire and break themselves up into hot coals as the fire burns. No splitting, no stirring, no adjusting logs. You don't even have to buy the heater. You build it out of cob and (hopefully) found scrap materials. We mentioned to everyone how much we love cast iron cookware, and lo and behold a wonderful person bought us a cast iron griddle that will work perfectly for the stovetop of out rocket mass heater. We've found bricks on craigslist for free, and now we're looking for firebrick.
Another example? Instead of building fences around each garden area to keep the deer and rabbits out, you build a double fence around the entire perimeter of the land and let your dog run along it and chase away the deer and rabbits before they get in, and pee along it so the smell also helps deter would-be veggie thieves. Dog gets exercise and you keep more of your food.
Design can work in every aspect of your life on the homestead. But before you design, you'll need to know not only what materials you have to work with, but what properties those materials possess and how they can be used to save you work. If you are smart, you can use free materials for everything. The more free stuff you use, the less work you have to do to make the money to spend on the not-free stuff. After all, that's what this whole blog is about.
I'm compiling a list here for my own reference (most of this blog is actually our recordkeeping, which we hope helps others in their process too)
Insulation:
- straw
- leaves
- wood ash
- sun - especially on a dark surface
- thermal mass like dirt, stone, brick or cob and/or dark color materials absorb heat
- metal and air transfers heat
- exhaust from rocket mass heater
- compost bins put out over 100ยบ or more in their decomposition process.
- underground
- thick thermal mass structures
- evaporation and flowing air
- spring fed streams
Building
- earth-rammed tires
- cans and/or bottles in cob
- cob (straw and mud)
- branches
- watch craigslist for give-aways, shelves, barrels, tools, old hot tubs, bathtubs etc
- windows - watch craigslist and the curb
- pallets - watch craigslist
- any containers you can get your hands on
- washing machine drums - great planters
- bath tubs
- hot tubs (people are always trying to get rid of those)
- Learn to root cuttings and get cuttings from trees from your friends and neighbors
- cardboard and newspaper (best weedkiller around)
Hot tubs and bathtubs can be used to store water both above ground and below grade. They can be linked together and filled from various rainwater catchment systems. You can fill them with gravel and grow water loving plants in them. You can filter grey water (especially if you're vegan like us and have no grease in your sink water) by running it through one planted tub, then another, and another, some with fish, some swampy.
You can use old box springs or chain link fencing for trellises and arbors.
Rammed earth tires (at 300lbs each) can be used to level off driveways and patios, build walls, shore up creek banks to support bridges, build dams and hold ponds.
Cans and bottles can be laid in a cob mortar like bricks then plastered over to form thinner walls and interior walls. Bottles (especially colorful ones) can be used on the south, east and west walls to allow in light to showers, breakfast nooks, kitchens and bedrooms.
Shelves: You can never have enough shelves. Homesteaders need them to store canned stuff, dried stuff, seed starters, fresh food, supplies, create storage walls separate rooms for bedrooms. Watch craigslist and curbside for these and snatch them up whenever you see them.
Windows - ALWAYS grab windows if you see them on the curbs on trash day or on Craigslist. You can always find a use for them. Cold frames, small greenhouses, solar gain for animal houses (and people houses), solar ovens, poop cookers to kill bacteria before composting poop, solar hot water heaters, solar dehydrators. Windows are some of the biggest expenses in building your home. If you have the windows on hand, you can custom build your walls to support any size windows you happen to have found.
Branches: You can save a lot of money building things out of branches. Using baling twine, you can create wattle and daub fences and pet shelters. I use them in place of tomato stakes because they branch out like the tomato plants do and give you plenty to hold your veggies up with - for beans, toms, any climbing viney plants. Tie and weave them together low to the ground and you can support your squash and melons and other ground-crawlers up off the ground so they don't rot.
Andrea found a washing machine drum, stuck a pole in it and a bicycle wheel on top of that, ran string off it and made a great planter out of it. The holes in the sides help the soil drain and running strings off the bicycle wheel gives the plants something to climb.
Tuesday, November 4, 2014
Floor
I once attended a workshop at the Mother Earth News Fair in Seven Springs, Pa where a Native American talked about how he set up his tipi on a gravel floor and put his fire pit below grade to distribute the heat throughout the floor. Ever since them I wanted to move my rocket stove under a gravel floor.
I read a forum post on permies.com about using gravel under the subflooring to prevent moisture, and it brought me back to the same idea. After reading that I'm wondering now whether or not I should use a vapor barrier.
It would seem to me that if I provide enough 'below grade' drainage along the uphill perimeter of the house that should significantly reduce moisture. Also the river gravel should prevent moisture wicking up from below. Then when I apply heat in the form of solar radiation and a rocket mass heater, that should provide enough evaporation to prevent condensation from building up within the gravel. I'm afraid that if I use a vapor barrier, that might lose breathe-ability, causing moisture pockets.
Guess we should test for radon :-\
So far, this is the plan. We'll see what happens.
Subscribe to:
Posts (Atom)